
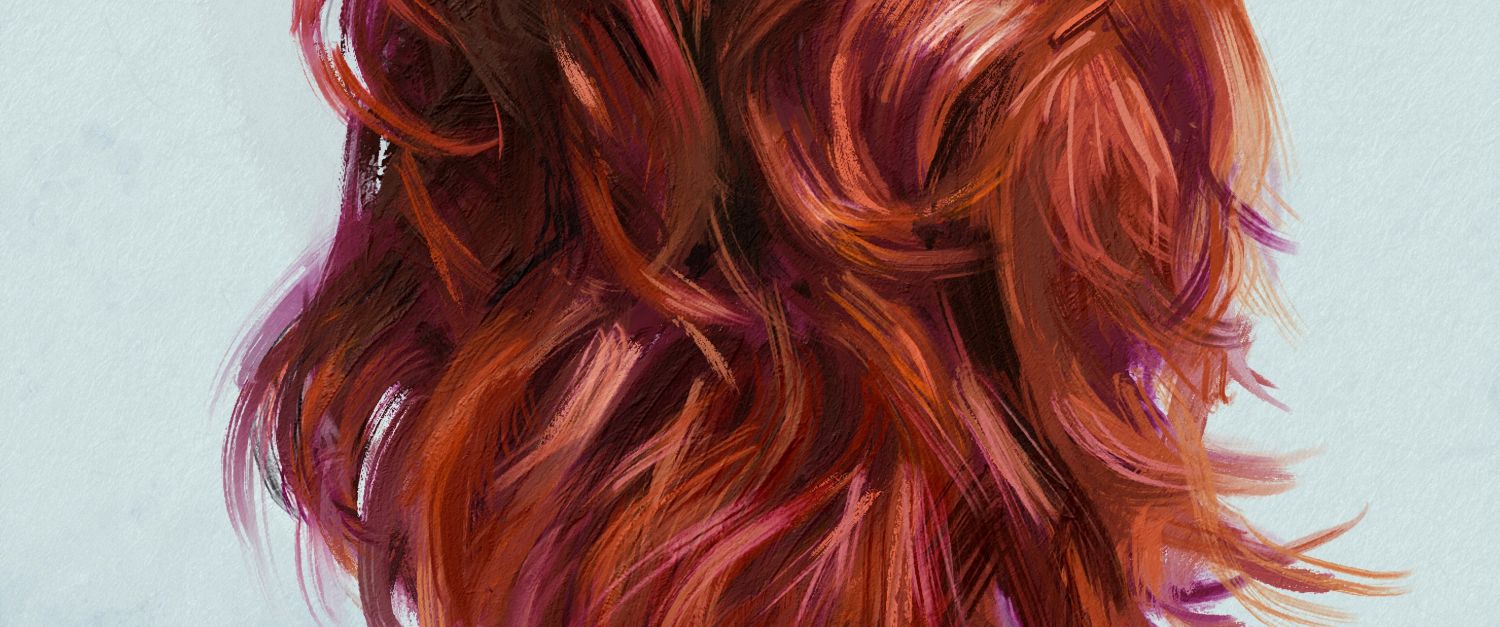

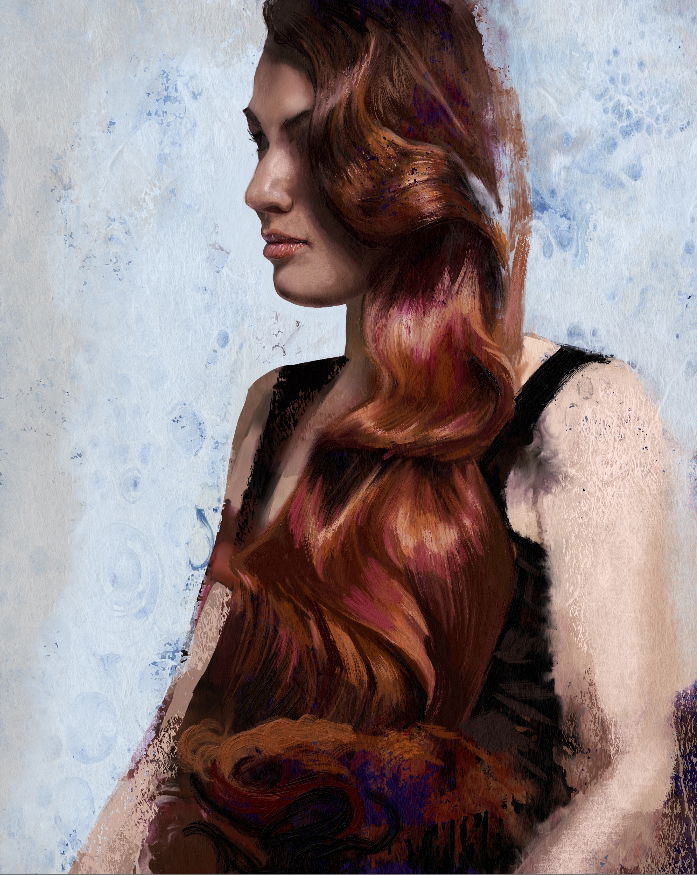
Painting hair is one of the most expressive and challenging aspects of digital portrait work. This tutorial will walk you through building structure, adding texture, blending color, and finishing your hair painting with dimension and shine—all within Rebelle 7, a natural media painting software. Whether you're aiming for realism or stylization, instructions provided by Rebelle Featured Artist Craig Werkheiser will help you develop an effective workflow and make the most of Rebelle’s powerful tools.
Watch this on YouTube: youtu.be/Hl_3W2qopa8
What You’ll Need:
Brush Types:
- Grunge Brush (especially Grunge 4) – for rough, layered block-ins and texture
- Bristle Brush – for natural hair flow and base structure
- Flat Dry Brush #2 – for blending and texturing strands
- Hairy Brush #2 – for detail work and fine strands
- Dry Tool – to lift water and enhance paper texture
- Hard Pastel Brush – for thick, painterly texture
Recommended Canvas Paper:
- Washi Hemp WH01 – provides a fibrous, organic texture that enhances dry media and watercolor blending. This paper is included in the Washi Papers set, which can be purchased in our shop.
Essential Settings:
- Water: 66-76 % depending on the brush
- Oiliness: 65–70 % for smooth blending
- Pigment Mode*: Enabled (Layers panel)
- Lock Transparency: Enabled when refining the subject
- Metallic Layer (Optional)*: Add glossy highlights
* This is a Rebelle 7 Pro feature
Step 1: Block in the Hair Shape
Start by selecting a dark base color, such as a deep red or brown. Use the Grunge Brush to sketch out the general shape of the hair. Don’t worry about details yet—focus on mass, movement, and flow. Think of it like sculpting the volume of the hair. Pro Tip: If the shape is running off the canvas, move it early to recenter your composition.
Once the basic form is in place, switch to the Bristle Brush. Set the water to around 66%, which helps create soft transitions and textures. Begin brushing in broad, curved strokes that follow the direction of the hair flow. This is where the rhythm and energy of the piece begin to emerge.
Step 2: Build Texture and Midtones
Use the Dry Tool to lightly lift water from the canvas. This creates texture and dries areas where you want to regain control. Next, return to Grunge Brush 4, set to Paint & Mix mode (under the brush properties, shortcut “2”), and an Oil setting of around 67%.
Use this combination to start blending in midtones—gently mixing your base with slightly lighter values. At this stage, you're not painting individual strands but shaping the volume and soft transitions of the hair. Think of it as “carving” the light into your form.
Let some brush strokes overlap and vary in opacity to simulate hair clusters and soft clumps. Keep the direction of strokes consistent with the intended flow.
Step 3: Blending Edges and Shaping the Hair
Switch your brush to Blend mode and begin softening the sharper edges where needed. Focus on the bottom of the hair or wherever it meets the background.
Rebelle’s blending engine creates rich, organic color transitions. For example, blending red and white might produce vibrant pinks or coral tones. Lean into these “happy accidents”—they add depth and interest.
Continue sculpting the shape and blur only where necessary. Keep some areas more defined to maintain structure and contrast.
Step 4: Add Midtones and Light Highlights
Now that the general shape is established, it’s time to build contrast.
Start by lightly brushing in midtones and subtle highlights using the Flat Dry Brush #2. This brush reacts well to pressure sensitivity. Press harder for bold, dry strokes or softer for light transitions.
Don’t add full highlights yet—this is about preparing the canvas for where the light will eventually hit. These strokes help define the rhythm and movement of the strands and give you a sense of where the light source is coming from.
Think: Where is the light falling? Where does the hair bunch, separate, or reflect?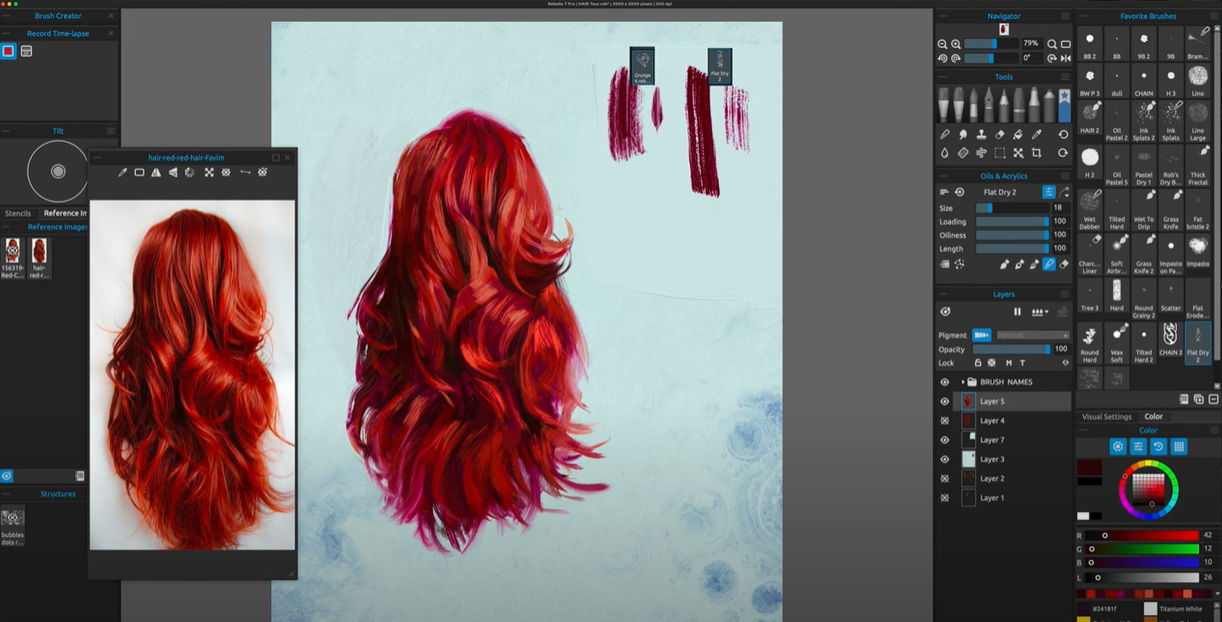
Step 5: Detail Work with Hair Brush
Switch to Hair Brush #2 for more refined strand work. This is where you can begin separating larger hair clumps into finer strands and adding definition around the edges.
Use varied pressure to simulate the tapering of strands. In highlight areas, gently pull this brush through midtones to create movement. Try to keep your strokes intentional—don't overdraw each strand, or it can flatten the image.
You can also build contrast by darkening shadows right next to lighter strands. This adds realism and helps the hair pop.
Step 6: Adding Shine with Metallic Layers
To give the hair a glossy, dimensional feel, create a new layer and name it something like “Shine.”
In the Layers panel, click the diamond icon to turn this into a Metallic Layer. Adjust the metallic shine in Visual Settings if needed—or leave it at default for a subtle sheen. This feature is available in Rebelle 7 Pro only.
Using any light color brush (Flat Dry or Hair Brush works well), paint over the highlight areas. This adds a beautiful 3D effect to the hair, especially when combined with a darker background.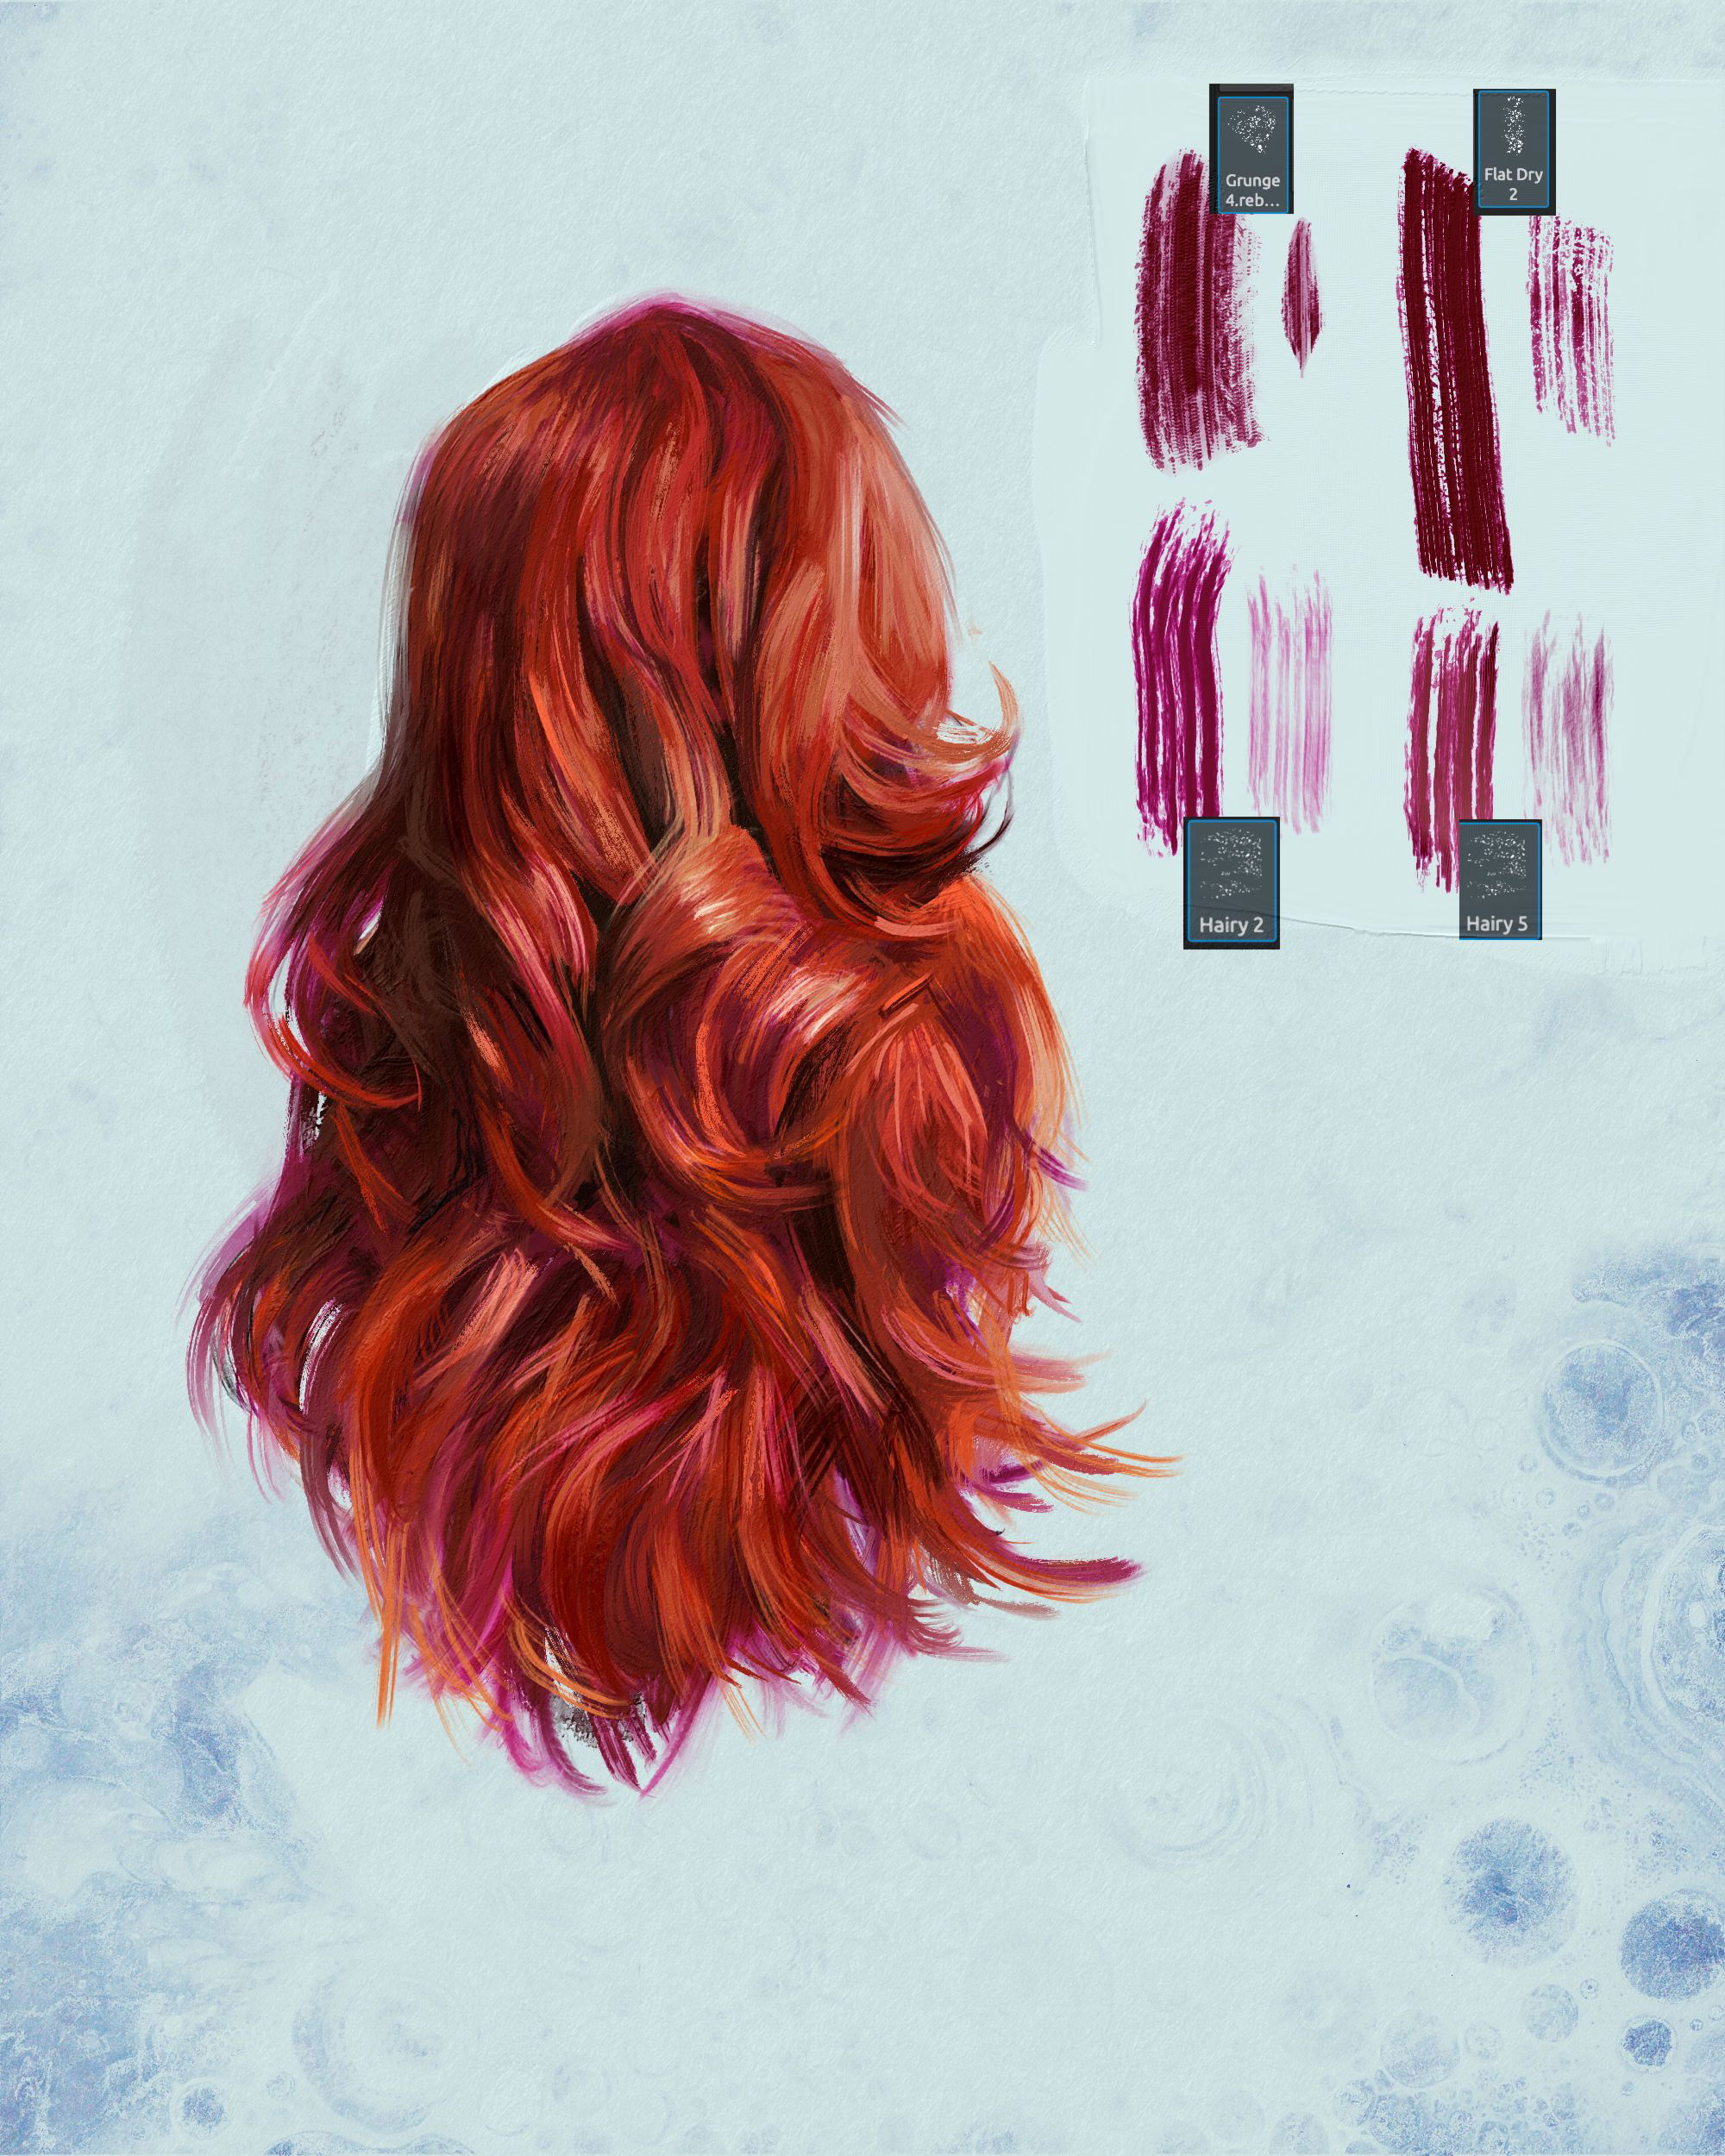
To take this into practice, Craig Werkheiser offers another video tutorial on how to paint curly hair on a portrait painting:
Watch this on YouTube: www.youtube.com/watch?v=sytJ6Cq0AcI
Step 7: Use Lock Transparency for Precision
When you're ready to clean up and add finer control, turn on Lock Transparency for the layer containing the subject. This will keep your brush strokes inside the silhouette, preventing color spill onto the background.
Use this to refine edge highlights, blending shadows into clothing or skin, or adding layered details without disrupting the form. 
Step 8: Enhance with Texture and Effects
For added visual interest:
- Add a floating curl or loose strand on a new layer.
- Enable metallic mode for extra sparkle.
- Use the Hard Pastel Brush over thick areas of paint for an impasto texture effect.
- Return to Grunge Brushes to build a fuzzy or atmospheric edge, especially around soft backgrounds like fog or light bloom.
 Don’t hesitate to experiment with brush combinations. Rebelle’s strength lies in blending natural-looking effects with digital control.
Final Details
Once you're satisfied with the form and texture, zoom in and add fine details using a precision brush.
Tip: Craig Werkheiser recommends Aaron Rutten’s Grass Knife Brush for eyelashes.
Clean up any edges, watercolor bleed, or overlapping strokes. Step back and review your contrast, flow, and color harmony one last time.
Are you happy with the result? Publish it to the Escape Motions Community Gallery or your social media and let fellow artists know that this tutorial helped you.
Happy Painting,
Escape Motions Team
-----
Craig Werkheiser is an illustrator with a background from the Pennsylvania College of Art & Design. His work spans figurative, portrait, and wildlife art, blending traditional and contemporary styles using digital tools like Rebelle. Visit his Featured Artist portfolio to learn more: www.escapemotions.com/featured-artists/craig-werkheiser