In the last blog posts, we announced the upcoming arrival of a brand new Rebelle 5 that will feature state-of-the-art Pigment color mixing, NanoPixel super-size, or watercolor granulation. Today, we’d like to introduce more features you can look forward to: 'Photoshop plugin', recording of the painting process, extended possibilities with the reference images, and more. Keep on reading to find out what's coming to Rebelle 5 soon.
 Photoshop plugin
Just like for Flame Painter, we've created a special plugin for Rebelle 5, called Escape Motions Connect. After the installation, the plugin runs in the background as a communication channel between Rebelle and Photoshop and allows you to export your layers back and forth with only one button click. It is a great time-saver especially when you need to make additional adjustments in Photoshop - you don't have to save your work every time you need to exchange layers between these two software programs. The plug-in works for you "behind the scene" and communicates between Rebelle and Photoshop, thus making your creative process seamless.
Record Time-lapse
Rebelle 5 will give you the power to record your painting process from start to finish and export your video in the .mp4 file format. Share it with your customers or post it to social media channels to show your fans the creative process behind the beautiful images you do.
Multiple Reference Images
From Rebelle 5 you will be able to load multiple images to the Reference Images panel. After the images have been imported to the panel, click to open them in a separate window to serve as a reference for your painting.
In the Reference Image panel, there will be new functions available - you will be able to fit the image to the screen, rotate it, zoom it, flip it vertically / horizontally, or see it in grayscale colors. Picking colors from the reference image is switched on by default.
Desktop and Tablet Mode
We're introducing two modes of the user interface to Rebelle 5: desktop and tablet mode.
In the Desktop mode, all panels are visible, giving you the options to:
- show or hide the panels according to your needs, either with the shortcut or from the Window menu; or
- move them under your cursor and back to its default position.
In the Tablet mode, all panels are hidden by default, so the canvas covers the whole screen, giving you more space for painting. You can show and hide any panel via the panel shortcut - either under the cursor, in the last position, or the center of the screen. In Preferences > General, you can find settings for the interface when in desktop/tablet mode.
You will be able to switch between these two modes simply by using a TAB shortcut.
Color and Color Set Panel Improvements
There are MANY new features implemented to improve working with the Color set panel and functioning of the colors, here are some of them:
- You can change the order of the color swatches inside the color set using drag & drop.
- You can move the selected swatch to a different color set using drag & drop.
- You can set small, medium, or large icons of the swatches.
- See the complete history of the last used colors.
- Last used colors are now automatically saved with a .REB file.
- Option to list swatches with the color names as one column.
- Gradient Preview - a representation of how the color mixes with the white and the black color, especially useful when using Pigments for painting.
Moreover, we've added an option to see and set the color in the HEXA code to the Color panel.
Select All Visible
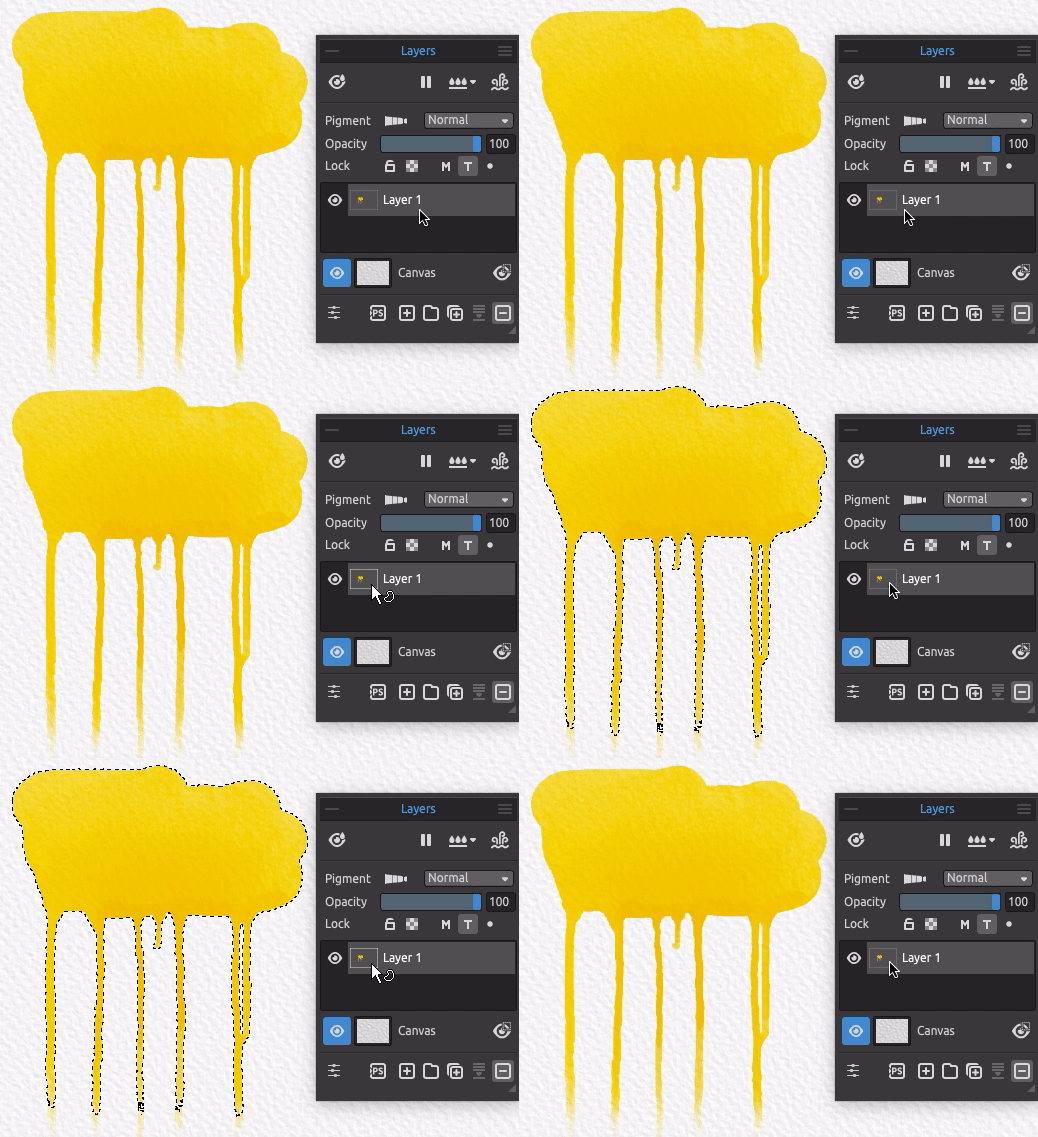
A simple task with such power! Rebelle 5 will allow you to use the Ctrl (on Windows) or Cmd (on macOS) shortcut with a click on a layer icon in the Layers panel to automatically select the content of the specific layer. Moreover, you will be able to set up your shortcut for this function in the Keyboard Shortcuts Preferences.
No need to go to the Selection tool and select what’s on the layer manually - this feature will surely save you some precious time!

Select a Layer with Mouse Click
Another very handy feature, especially when you work with many layers, is "Select Layer from Canvas". By holding Ctrl+Shift (on Windows) or Cmd+Shift (on macOS) and clicking on an object on the canvas, its particular layer gets automatically selected in the Layers panel. This is another feature that will save you precious time you can use for your creativity instead of searching for the layer in the "pile" of layers. :)
This is still not the end of the new features' rollout, we're revealing on more in the next blog post. What's your favorite feature so far? Let us know in the comments! :)
Stay creative!
Escape Motions Team
Speed-painting Video: Rebelle Featured Artist Georg Ireland | @georg.ireland


