Rebelle 6 is coming tomorrow! In addition to the Liquify and Warp tools, Fractal resize, 'Favorite' brushes, upgraded Brush Creator, new Filters, and other features we talked about in the previous blogs, more quality-of-life features are coming to the new version that will make your creative journey easier. Let's dive into them today.
Layer Masking Tools
More masking options have been added to the Layers panel in Rebelle 6. You will be able to add a 'Layer Mask' or set a layer as a 'Clipping Mask' by right-clicking on the layer in the Layers panel. The masks are a powerful way to control a layer's visibility and are familiar from other paint software.
Layer Masks
To control the transparency level of a layer we use a Layer Mask. Its great advantage is the ability to independently adjust the transparency of different areas of the layer. This is great for example when blending different layers with seamless transitions. A layer mask in Rebelle, like in other software, uses black and white to show and hide different parts of the layer.
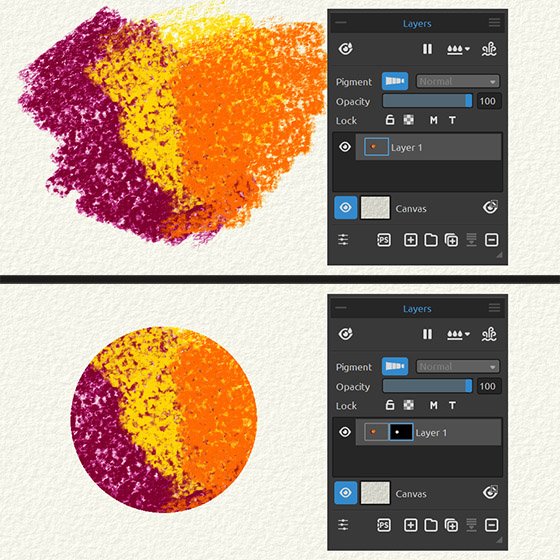 The top image shows the original layer, the bottom image shows the layer mask.
Clipping Masks
Clipping Mask uses one layer's content and transparency to control another layer's visibility. To create a clipping mask we need two layers. The layer on the bottom controls the visibility of the layer above it. The bottom layer becomes the mask, and the layer above it is the layer that's clipped with the mask below.
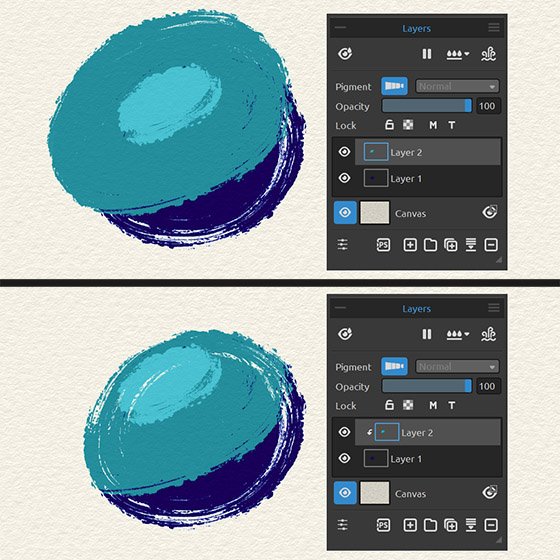 Example of Clipping Mask Layer and its use.
The masking in Rebelle 6 comes with one change - we have removed the visual representation of an 'Influenced layer' (a small dot in the Layers panel). Now the 'Masking Fluid Layer' and 'Tracing Layer' influence all layers, or when they are located within a group, they influence all layers in that group. This makes the user interface cleaner and the overall process of working with masks and masking fluids much more straightforward.
Grid and Guides
New options for laying down fully customizable grids and guides will be featured in Rebelle 6. Grids are a common method in real-world painting and drawing, so this will help artists tremendously. You will be able to show grids and guides and enable snapping to grids directly via the View menu.
Grid
The grid is a great help when aligning objects or laying out elements symmetrically. You can split the grid based on the units of length or evenly in Preferences. For example, you need a grid line for every 10 centimeters of canvas and the grid should have 5 subdivisions. When split evenly, the grid will contain the exact number of horizontal and vertical lines you specify. For example, you need 10 grid lines vertically and 15 grid lines horizontally.
Guides
Guides have a similar purpose to a grid. The difference is that you need to place every guideline yourself. When guides are visible, a new icon at the top left side of the viewport appears giving you a quick option to add new and edit existing guides. A visual representation of a guide is shown when you are outside the canvas:
- When above or below the canvas, you are adding vertical guides.
- When to the canvas's left or right, you are adding horizontal guides.
- When on the canvas, you can draw lines (segments) in any direction. You can lock the angle with the Shift shortcut. This is a very practical way to prepare the composition for your image.
Canvas Bounds
We have also implemented an option to show additional guides at the edges of the canvas, in the middle of the canvas, in the thirds, and in quarters of the canvas. Paint strokes cannot be locked at the bounds, but when you move selections, you can see short lines on the border of the canvas and the selection can be locked to them.
You will be able to view canvas bounds and enable snapping to guides via the View menu:
- View/Snap to Grid - The object will snap to the lines of the currently active grid.
- View/Snap to Guides - The object will snap to the currently active guides.
- View/Snap to Canvas bounds - The object will snap to the bounds (edges), to the center of the canvas, or the quarters or thirds of the canvas.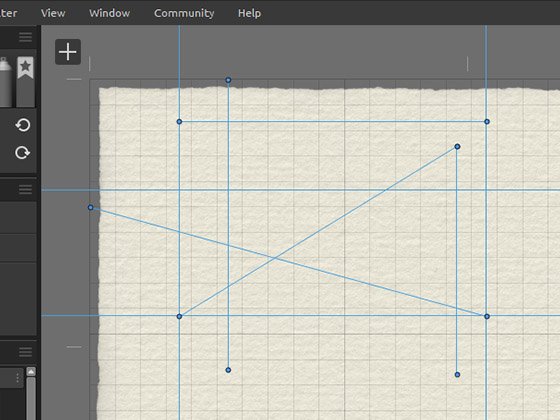 Examples of grid, guides and canvas bounds in Rebelle 6.
Rebelle 6 will also give you all the possibilities for customization of the grid, guides, and bounds - from adjusting the color, opacity, line width, and other grid and guides' settings in the Preferences.
Reference Image Guides
Lastly, we have also implemented guides for the reference images you open in the Reference Image panel. These additional guides will be visible in the reference image as well as on the canvas. It helps a lot when you want to set the right proportions of the drawing object.
In the upcoming version, you will be able to show and transform semi-transparent reference images directly on the canvas. This is another option how to use reference images - as an overlay on the painting. You can modify the reference image guides' color, opacity, and line width in Preferences. 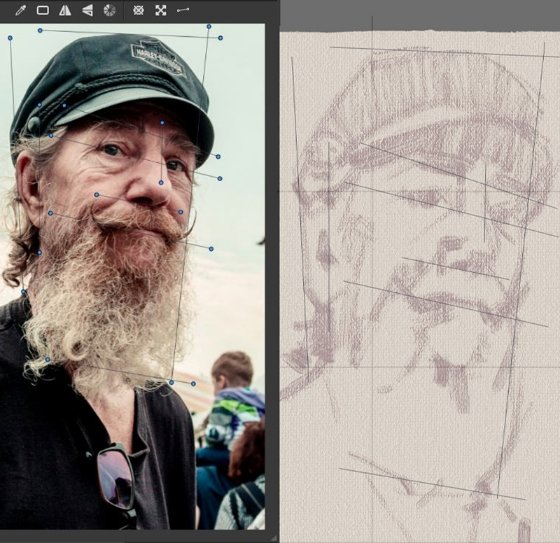 Example of reference image guides on the reference image showing on the canvas.
"When it comes to drawing, what students struggle with most is positioning and, of course, proportions. These guides are ideal for help with that. Place a few guides in the appropriate positions and it's pretty much like measuring with a pencil or a brush, or even sight-size drawing and painting. The great thing about this is that because the guides remain visible throughout the entire painting process, they assist with positioning and proportion throughout. A wonderful addition to Rebelle!" ~ Tim Shelbourne
New Wet and Dry Media
Amazing 240+ brushes are coming with Rebelle 6! You can expect some new brush types we already talked about - grunge, scumbling, textured brush presets, improved pencils and new dry and oil pastels.
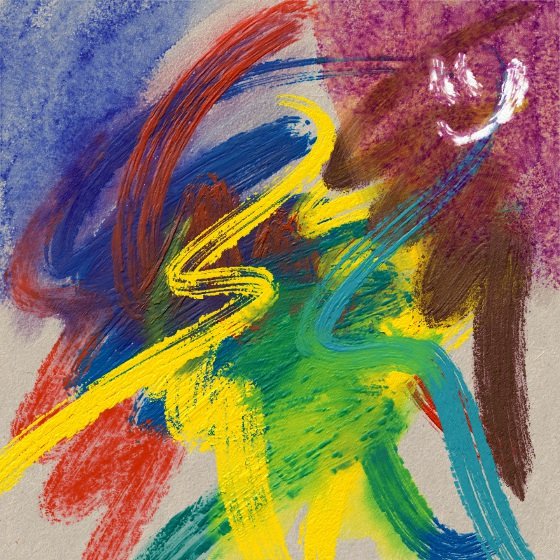 Examples of new wet tools.
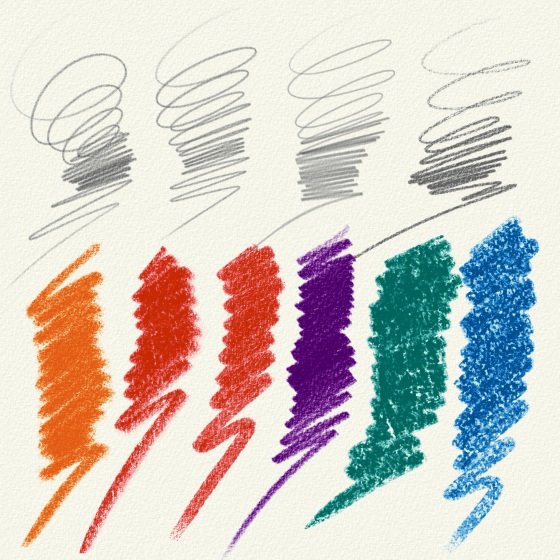 Examples of new dry tools.
Rebelle 6 is Coming This Week
We hope these new features will step up your art game and give you immense possibilities with Rebelle software. Even better, you do not have to wait for Rebelle 6 for too long - it will be released this week! Be prepared, refresh your Inbox and wait for the creative magic to come true.
Rebelle 6 and Rebelle 6 Pro
Rebelle 6 is coming this week in two editions - the standard Rebelle 6 full of great new features and Rebelle 6 Pro that in addition offers the extra experience of Fractal Image Processing. Of course, the Pro edition also includes the already-known Pigments, NanoPixel, Color Management and Photoshop plug-in.
Pricing
The regular price for Rebelle 6 is $89.99 and for Rebelle 6 Pro is $149.99.
All existing owners of Rebelle 5 are eligible for a 50% discount. The upgrade price will be $44.99 for the standard and $74.99 for the Pro edition.
Moreover, all Rebelle 6 users are eligible to upgrade to Rebelle 6 Pro for the price difference at any time.
Users who purchased Rebelle 5 standard (MSRP $89.99) or Pro (MSRP $149.99) from November 1st, 2022 until the release of Rebelle 6 are eligible for a free upgrade to the same edition of Rebelle 6.
Upgrading is optional, you can continue using your actual version for as long as you like.
We are grateful you are with us on this exciting journey and would like to send a BIG THANK YOU for your great support.
Keep it creative!
Your Escape Motions Team
----
Cover image by Carles | See portfolio
Blog images: Tim Shelbourne, reference image from Earthsworld.com

